jQuery Form Validation: HTML & CSS Tutorial
Build a simple registration form with HTML and CSS, then validate it on the client with the jQuery Validation plugin before the data ever reaches your backend. Four fields are validated — name, email, username and password — each with its own inline error message. Available in English and Español, use the tabs below to switch.
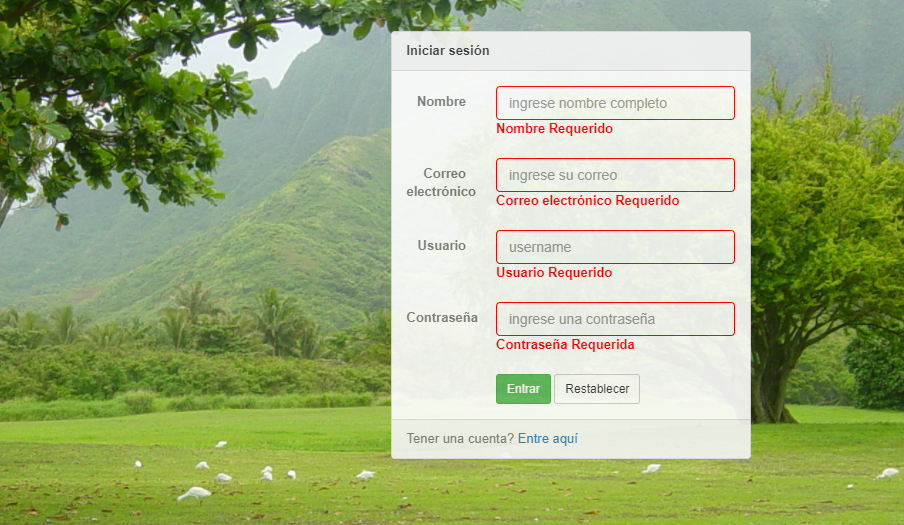
Formulario HTML y CSS con validación de jQuery
En esta guía te muestro cómo construir un formulario de registro con HTML y CSS, y validarlo con la librería jQuery Validation antes de guardar los datos en la base de datos. El ejemplo valida cuatro campos: nombre, correo electrónico, nombre de usuario y contraseña, mostrando un mensaje de error específico junto a cada campo cuando la regla no se cumple.
Validar un formulario a mano con JavaScript puro implica escribir una función distinta por cada regla, lo cual es lento y difícil de mantener a medida que el formulario crece. La librería validate.js de jQuery resuelve esto con un objeto de configuración simple: le indicas qué regla aplica a cada campo (requerido, longitud mínima, formato de correo, etc.) y qué mensaje mostrar si falla. En este ejemplo usamos la versión jQuery 1.11.
Estos son los archivos que debes cargar al inicio de tu página para que el ejemplo funcione:
Formulario HTML: index.html
Esta es la estructura HTML completa del formulario. Lo importante aquí son los atributos
id de cada input: son el punto donde jQuery 1.11
se conecta con el formulario para leer y validar cada campo.
Archivo de estilos CSS: index.css
Este es el CSS completo para que el formulario se vea más cuidado. La parte que realmente importa para la validación: cuando un campo no cumple su regla, estos estilos le ponen un borde rojo para que el error sea evidente de un vistazo.
Archivo jQuery: formValidation.js
Y este es el código jQuery completo. Aquí definimos las reglas de validación: cada regla se
asocia al name de un input del formulario, y junto a ella un mensaje que se muestra
cuando esa regla específica falla.
Otras reglas útiles de jQuery Validation
Además de required, minlength y email, la librería trae más reglas listas para usar:
- maxlength: comprobará que el número de caracteres es menor al especificado
- minlength: comprobará que el número de caracteres es mayor al especificado
- rangelength: comprobará que el número de caracteres introducidos se encuentra entre el rango especificado, por ejemplo rangelength:[50,250]
- min: se aplica a campos numéricos, comprueba que como mínimo se introduzca un valor igual al especificado
- max: se aplica a campos numéricos, comprueba que como mucho se introduzca un valor igual al especificado
- equalTo: se usa para comprobar que el valor de dos campos sea el mismo, por ejemplo la confirmación de una contraseña o correo. Su uso sería de la siguiente forma: confirm_email:{equalTo:"#email"}
- url: comprobará que el valor introducido tiene formato de URL
- email: comprobará que el valor introducido tiene formato de e-mail
Con esto ya tienes un formulario de registro completo, validado en el cliente antes de enviarlo a tu backend. Descarga el ejemplo o mira la demo en vivo con los botones de arriba para probarlo tú mismo.
HTML and CSS form with jQuery validation
In this guide I'll show you how to build a registration form with HTML and CSS, and validate it with the jQuery Validation plugin before the data is saved to the database. The example validates four fields — name, email, username and password — showing a specific error message next to each field whenever its rule isn't met.
Validating a form by hand with plain JavaScript means writing a separate function for every rule, which is slow and hard to maintain as the form grows. jQuery's validate.js library solves this with a simple configuration object: you tell it which rule applies to each field (required, minimum length, email format, etc.) and which message to show when it fails. This example uses jQuery 1.11.
Here are the files you need to load at the top of your page for the example to work:
HTML file: index.html
This is the full HTML markup for the form. What matters most here are each input's id
attributes: they're the hook that jQuery 1.11
uses to read and validate every field.
CSS file: index.css
Here's the full CSS for a form that looks a bit more polished. The part that actually matters for validation: whenever a field breaks its rule, these styles add a red border so the error is obvious at a glance.
jQuery file: formValidation.js
And here's the full jQuery code. This is where the validation rules are defined: each rule is
tied to an input's name, together with the message shown when that specific rule
fails.
Other useful jQuery Validation rules
Besides required, minlength and email, the plugin ships with more ready-to-use rules:
- maxlength: checks that the number of characters is less than the one specified
- minlength: checks that the number of characters is greater than the one specified
- rangelength: checks that the number of characters entered falls within the specified range, e.g. rangelength:[50,250]
- min: applies to numeric fields, checks that a value at least equal to the one specified is entered
- max: applies to numeric fields, checks that a value at most equal to the one specified is entered
- equalTo: used to check that the value of two fields matches, for example a password or email confirmation. Used like: confirm_email:{equalTo:"#email"}
- url: checks that the entered value has a URL format
- email: checks that the entered value has an e-mail format
And that's it — a complete registration form, validated on the client before it's sent to your backend. Download the example or try the live demo with the buttons above.